
MaterialCalendarView – customizable calendar widget for Android
Download this fully customizable calendar widget for Android and make a calendar in your mobile app personalized. See the example.
Download this fully customizable calendar widget for Android and make a calendar in your mobile app personalized. See the example.
In our internal company mobile project, FreeQuest – the leave tracking app, we needed to use a calendar widget. Of course, we could use a classic CalendarView, but the main problem was that this widget isn’t fully customizable. We had to use two types of calendar widgets: a date picker to select dates and a classic calendar to show absence days in the form of icons below the number of the day. That’s why we created our calendar widget, called MaterialCalendarView.
Find the updated version of this article here.
In this post, I will describe how to create a simple calendar app using our library.
The first thing we have to do is import the Material CalendarView library. To do it, open the project’s build.gradle file and make sure you have defined the mavenCentral repository like below:
allprojects {
    repositories {
        mavenCentral()
    }
}
If yes, open the module’s build.gradle file and simply add the following line to the dependency part:
dependencies {
    compile 'com.applandeo:material-calendar-view:1.0.1'
}
Our simple app will consist of three views. The first one will contain the main calendar where we display our notes in the form of icons. The second one will be a view which let us create a new note. The last view will let as a preview that note.
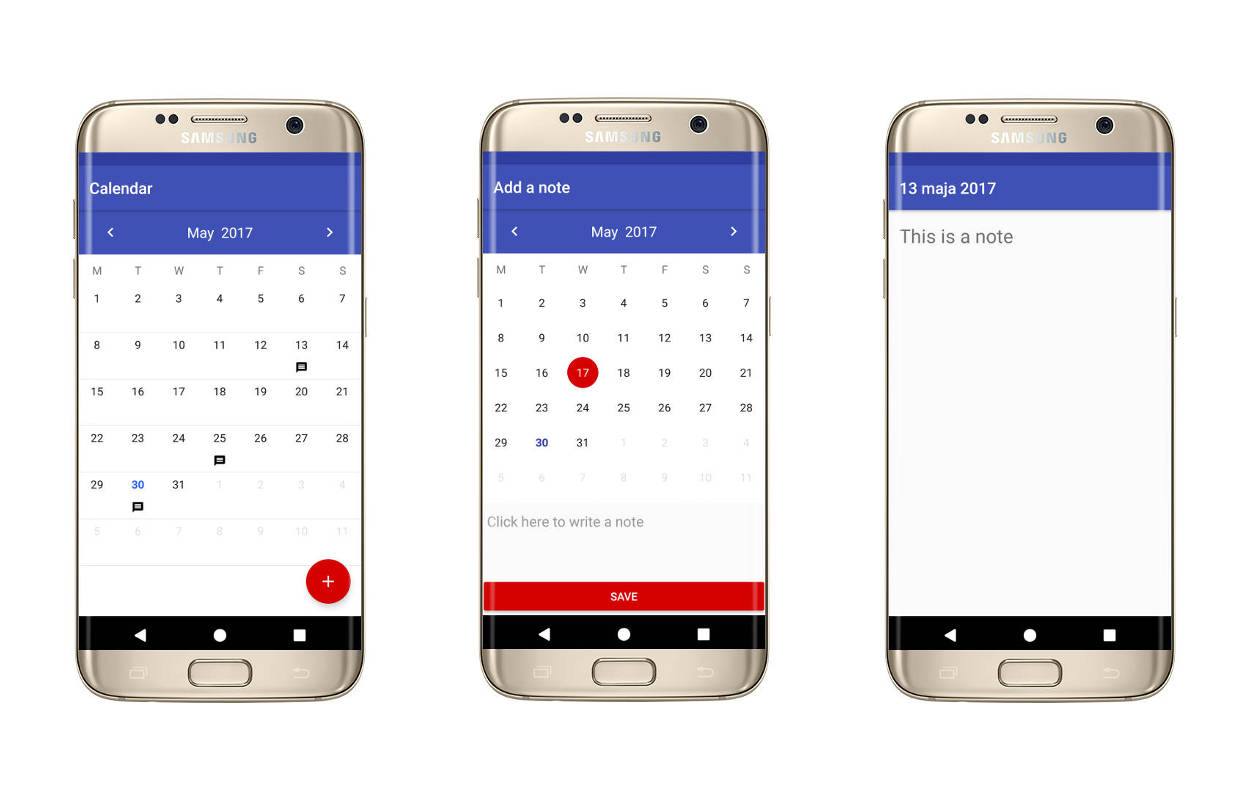
As you can see in the first picture we are using a floating action button. Before you start you have to add compile ‘com.android.support:design:25.3.1’ to your dependency. If you do this you can start creating views:
activity.main.xml
<?xml version="1.0" encoding="utf-8"?>
<android.support.constraint.ConstraintLayout xmlns_android="http://schemas.android.com/apk/res/android"
 xmlns_app="http://schemas.android.com/apk/res-auto"
 xmlns_tools="http://schemas.android.com/tools"
 android_layout_width="match_parent"
 android_layout_height="match_parent"
 tools_context="com.applandeo.myapplication.MainActivity">

 <com.applandeo.materialcalendarview.CalendarView
   android_id="@+id/calendarView"
   android_layout_width="0dp"
   android_layout_height="0dp"
   app_headerColor="@color/colorPrimary"
   app_layout_constraintBottom_toBottomOf="parent"
   app_layout_constraintLeft_toLeftOf="parent"
   app_layout_constraintRight_toRightOf="parent"
   app_layout_constraintTop_toTopOf="parent" />

 <android.support.design.widget.FloatingActionButton
   android_id="@+id/floatingActionButton"
   android_layout_width="wrap_content"
   android_layout_height="wrap_content"
   android_layout_margin="@dimen/margin_16"
   android_src="@drawable/ic_add_white_24dp"
   app_layout_constraintBottom_toBottomOf="parent"
   app_layout_constraintRight_toRightOf="parent" />

</android.support.constraint.ConstraintLayout>
add_note_activity.xml
<?xml version="1.0" encoding="utf-8"?>
<android.support.constraint.ConstraintLayout xmlns_android="http://schemas.android.com/apk/res/android"
   xmlns_app="http://schemas.android.com/apk/res-auto"
   android_layout_width="match_parent"
   android_layout_height="match_parent">

   <com.applandeo.materialcalendarview.CalendarView
       android_id="@+id/datePicker"
       android_layout_width="0dp"
       android_layout_height="370dp"
       app_datePicker="true"
       app_headerColor="@color/colorPrimary"
       app_layout_constraintLeft_toLeftOf="parent"
       app_layout_constraintRight_toRightOf="parent"
       app_layout_constraintTop_toTopOf="parent"
       app_selectionColor="@color/colorAccent"
       app_todayLabelColor="@color/colorPrimaryDark" />

   <android.support.v7.widget.AppCompatButton
       android_id="@+id/addNoteButton"
       android_layout_width="0dp"
       android_layout_height="wrap_content"
       android_text="@string/save"
       android_textColor="@android:color/white"
       app_backgroundTint="@color/colorAccent"
       app_layout_constraintBottom_toBottomOf="parent"
       app_layout_constraintLeft_toLeftOf="parent"
       app_layout_constraintRight_toRightOf="parent" />

   <EditText
       android_id="@+id/noteEditText"
       android_layout_width="0dp"
       android_layout_height="72dp"
       android_layout_margin="@dimen/margin_8"
       android_background="@null"
       android_gravity="top"
       android_hint="@string/write_note"
       app_layout_constraintBottom_toTopOf="@id/addNoteButton"
       app_layout_constraintLeft_toLeftOf="parent"
       app_layout_constraintRight_toRightOf="parent"
       app_layout_constraintTop_toBottomOf="@id/datePicker" />

</android.support.constraint.ConstraintLayout>
note_preview_activity.xml
<?xml version="1.0" encoding="utf-8"?>
<android.support.constraint.ConstraintLayout xmlns_android="http://schemas.android.com/apk/res/android"
   xmlns_app="http://schemas.android.com/apk/res-auto"
   android_layout_width="match_parent"
   android_layout_height="match_parent">

   <TextView
       android_id="@+id/note"
       android_layout_width="0dp"
       android_layout_height="wrap_content"
       android_layout_margin="@dimen/margin_16"
       android_hint="@string/no_note"
       android_textSize="24sp"
       app_layout_constraintLeft_toLeftOf="parent"
       app_layout_constraintRight_toRightOf="parent"
       app_layout_constraintTop_toTopOf="parent" />

</android.support.constraint.ConstraintLayout>
I don’t need to describe all lines of the code because I assume you understand it and I will only focus on <com.applandeo.materialcalendarview.CalendarView>. As you can see our widget let you customize its header colour, today’s number colour, selection colour in the picker mode and more. A list of all available tags is in our GitHub’s README. Another important tag is app:datePicker, by default its attribute is set false what means that we use the CalendarView as a standard calendar. If you set it true, as we did in the add_note_activity.xml, you can use it as a date picker that let you select a date and then getting it using the appropriate method I will describe in the further part.
If we have created views already we can take a look at the Java code:
public class MainActivity extends AppCompatActivity {
   public static final String RESULT = "result";
   public static final String EVENT = "event";
   private static final int ADD_NOTE = 44;

   private CalendarView mCalendarView;
   private List<EventDay> mEventDays = new ArrayList<>();

   @Override
   protected void onCreate(Bundle savedInstanceState) {
       super.onCreate(savedInstanceState);
       setContentView(R.layout.activity_main);

       mCalendarView = (CalendarView) findViewById(R.id.calendarView);

       FloatingActionButton floatingActionButton = (FloatingActionButton) findViewById(R.id.floatingActionButton);
       floatingActionButton.setOnClickListener(new View.OnClickListener() {
           @Override
           public void onClick(View v) {
               addNote();
           }
       });

       mCalendarView.setOnDayClickListener(new OnDayClickListener() {
           @Override
           public void onDayClick(EventDay eventDay) {
               previewNote(eventDay);
           }
       });
   }

   @Override
   protected void onActivityResult(int requestCode, int resultCode, Intent data) {
       if (requestCode == ADD_NOTE && resultCode == RESULT_OK) {
           MyEventDay myEventDay = data.getParcelableExtra(RESULT);
           mCalendarView.setDate(myEventDay.getCalendar());
           mEventDays.add(myEventDay);
           mCalendarView.setEvents(mEventDays);
       }
   }

   private void addNote() {
       Intent intent = new Intent(this, AddNoteActivity.class);
       startActivityForResult(intent, ADD_NOTE);
   }

   private void previewNote(EventDay eventDay) {
       Intent intent = new Intent(this, NotePreviewActivity.class);
       if(eventDay instanceof MyEventDay){
           intent.putExtra(EVENT, (MyEventDay) eventDay);
       }
       startActivity(intent);
   }
}
As you may notice in the main class we are using three methods available in our CalendarView: setEvents(), setOnDayClickListener() and setDate(). As the name suggests setEvents() method adds events to the calendar. To use it we have to create a list of EventDay objects and pass them to the method.
List<EventDay> mEventDays = new ArrayList<>();

CalendarView mCalendarView = (CalendarView) findViewById(R.id.calendarView);
MyEventDay myEventDay = …

mEventDays.add(myEventDay);
mCalendarView.setEvents(mEventDays);
EventDay object’s constructor takes two variables – a date in the form of Calendar object and an image resource:
new EventDay(Calendar day, int imageResource);
In our sample app we have to add a note to the created event yet. That’s why we have to extend EventDay as in example below:
class MyEventDay extends EventDay implements Parcelable {
   private String mNote;

   MyEventDay(Calendar day, int imageResource, String note) {
       super(day, imageResource);
       mNote = note;
   }

   String getNote() {
       return mNote;
   }

   private MyEventDay(Parcel in) {
       super((Calendar) in.readSerializable(), in.readInt());
       mNote = in.readString();
   }

   public static final Creator<MyEventDay> CREATOR = new Creator<MyEventDay>() {
       @Override
       public MyEventDay createFromParcel(Parcel in) {
           return new MyEventDay(in);
       }

       @Override
       public MyEventDay[] newArray(int size) {
           return new MyEventDay[size];
       }
   };

   @Override
   public void writeToParcel(Parcel parcel, int i) {
       parcel.writeSerializable(getCalendar());
       parcel.writeInt(getImageResource());
       parcel.writeString(mNote);
   }

   @Override
   public int describeContents() {
       return 0;
   }
}
*Parcelable interface is needed to pass MyEventDays through Intents.
The second method, setOnDayClickListener() is responsible for handling clicks. When the user taps any day row listener will return EventDay object with appropriate date and note.
mCalendarView.setOnDayClickListener(new OnDayClickListener() {
   @Override
   public void onDayClick(EventDay eventDay) {
       ...
   }
});
The third method simply scrolls the calendar to a proper calendar page. In our case to date selected in the AddNoteActivity.
mCalendarView.setDate(myEventDay.getCalendar());
public class AddNoteActivity extends AppCompatActivity {
   @Override
   protected void onCreate(Bundle savedInstanceState) {
       super.onCreate(savedInstanceState);
       setContentView(R.layout.add_note_activity);

       final CalendarView datePicker = (CalendarView) findViewById(R.id.datePicker);
       Button button = (Button) findViewById(R.id.addNoteButton);
       final EditText noteEditText = (EditText) findViewById(R.id.noteEditText);

       button.setOnClickListener(new View.OnClickListener() {
           @Override
           public void onClick(View v) {
               Intent returnIntent = new Intent();

               MyEventDay myEventDay = new MyEventDay(datePicker.getSelectedDate(),
                       R.drawable.ic_message_black_48dp, noteEditText.getText().toString());

               returnIntent.putExtra(MainActivity.RESULT, myEventDay);
               setResult(Activity.RESULT_OK, returnIntent);
               finish();
           }
       });
   }
}
In this class, we are creating MyEventDay objects using another important method that is getSelectedDate(). When the CalendarView is in the picker mode we can use that method to get the selected date in the form of the Calendar object.
MyEventDay myEventDay =
new MyEventDay(datePicker.getSelectedDate(), R.drawable.ic_message_black_48dp, noteEditText.getText().toString());
public class NotePreviewActivity extends AppCompatActivity {
   @Override
   protected void onCreate(Bundle savedInstanceState) {
       super.onCreate(savedInstanceState);
       setContentView(R.layout.note_preview_activity);

       Intent intent = getIntent();

       TextView note = (TextView) findViewById(R.id.note);

       if (intent != null) {
           Object event = intent.getParcelableExtra(MainActivity.EVENT);

           if(event instanceof MyEventDay){
               MyEventDay myEventDay = (MyEventDay)event;

               getSupportActionBar().setTitle(getFormattedDate(myEventDay.getCalendar().getTime()));
               note.setText(myEventDay.getNote());

               return;
           }

           if(event instanceof EventDay){
               EventDay eventDay = (EventDay)event;
               getSupportActionBar().setTitle(getFormattedDate(eventDay.getCalendar().getTime()));
           }
       }
   }

   public static String getFormattedDate(Date date) {
       SimpleDateFormat simpleDateFormat = new SimpleDateFormat("dd MMMM yyyy", Locale.getDefault());
       return simpleDateFormat.format(date);
   }
}
In the last one class we only display informations from MyEventDay object, nothing more.
That’s all, simple calendar and simple usage. Of course you can expand that sample app, for instance implement data base or even if you want you can improve our Material CalendarView. It’s open source, feel free!
 Hi, I’m Marcin, COO of Applandeo
Are you looking for a tech partner? Searching for a new job? Or do you simply have any feedback that you'd like to share with our team? Whatever brings you to us, we'll do our best to help you. Don't hesitate and drop us a message!
Drop a message