
Automated testing of Angular application using Protractor
How to configure Protractor to run automated tests on angular apps?
How to configure Protractor to run automated tests on angular apps?
Parallel to the development of angular, internet applications is becoming more and more advanced. Taking care of the quality of the software and wanting to ensure its reliability, it is crucial to create a tool for customizing automated tests that would handle the functionality that Angular offers.
As the application is growing and growing up, tests need to be updated, so good code organizations are very helpful in this case.
After initializing the application we are going to work with two fields – e2e directory and protractor.conf.js.
By default, protractor gives us jasmine as BDD framework. We can change it to mocha for example, but for our needs it is enough. Why do we need jasmine? With this thing we can execute expects, prepare reporters or create custom reporter to extend our protractor and this is what we are going to do now. By extending protractor I mean using external package for generating HTML reports with screenshots on failure. To do this we are going to use protractor-html-reporter-2 package.
In your config file you can keep any information which determine how your tests are executed. So if you need to tell protractor to run tests on more than one browser, use reporter or two, generate html report or just do your custom reporter you need to do it here. Also in config file you will keep information about how your tests should connect to browser, where it can find selenium server and many others. Here you can find information about all options that you can use in your protractor config file.
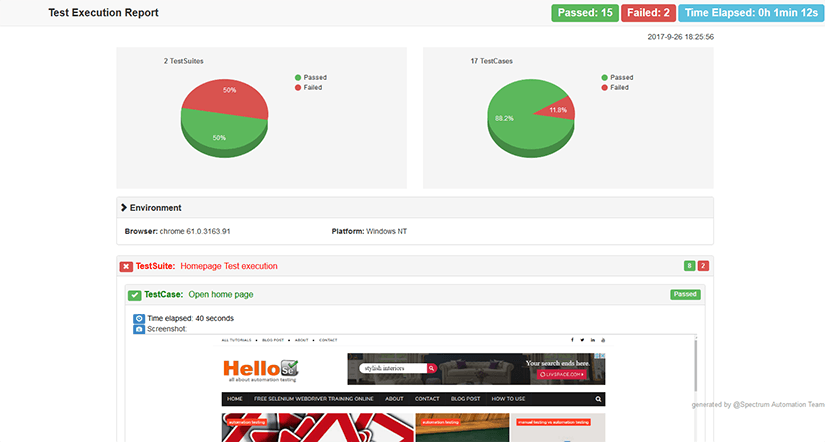
The testing itself does not bring anything until you receive and analyze the result. In order to do it as effectively as possible, we need a report in a readable form. This is why we are going to use protractor-html-reporter-2.
The main functionality of this reporter is the generation of HTML reports based on the test result. Its configuration is more extensive, but using just a basic elements gives a satisfactory result. The second rather important element is the ability to take screenshots when the test fails. To achieve the desired results we must use a package called jasmine-reporters.
To run the reporter you have to follow documentation but there is a few things that you have to remember about:
jasmine.getEnv().addReporter({
    specDone: result => {
       if (result.status == 'failed') {
           browser.getCapabilities().then((caps) => {
               const browserName = caps.get('browserName');
               browser.takeScreenshot().then((png) => {
                   const filename = src + browserName + '-' + result.fullName + '.png';
                       const stream = fs.createWriteStream(filename);
                       stream.write(new Buffer(png, 'base64'));
                       stream.end();
                   });
               });
             }
           }
        }
     );
But you have to remember that the protractor-html-reporter-2 has some bugs. And without any fixes for example screenshots would not appear.
During application, life cycle tests must be managed so when you are keeping all your settings and methods in the same file it is easy to get lost. In this case, the Page Object Model come to help us. You may ask: What it gives to us? The answer is very easy – you can close sequences of steps in the external method, for example, login method:
Before using PMO:
it(‘I want to log in’, () => {
    $('#login').sendKeys(‘login’);
    $('#password').sendKeys(‘password’);
    $('.btn-login').click()	;
     // and here you have to do expect to check if user is correctly logged in
});
After using PMO:
// login.po.ts
loginUser(login, password) {
    $('#login').sendKeys(login);
    $('#password').sendKeys(password);
    $('.btn-login').click()	;
}

// login.e2e-spec.ts
// calling a class instance
const login: Login = new Login();

it(‘I want to log in’, () => {
    login.loginUser(‘name’, ‘password’);
     // and here you have to do expect to check if user is correctly logged in
});
Thanks to PMO our tests are getting more readable and easier to understand as for QA as for developer. The other thing that we can win by using PMO is keeping the DRY rule. When there is some steps where you have to do login or need to get access to elements in the same way external methods defined in PO are coming with help.
// Before using PMO

describe(‘Login’, () => {
    it(‘I want to login’, () => {
        $('#login').sendKeys(login);
        $('#password').sendKeys(password);
        $('.btn-login').click();
        //do expects
    });

    it(‘and once again I want to login’, () => {
	$('#login').sendKeys(login);
        $('#password').sendKeys(password);
        $('.btn-login').click();
        //do expects
    });

    it(‘and once again I want to login’, () => {
	$('#login').sendKeys(login);
        $('#password').sendKeys(password);
        $('.btn-login').click();
        //do expects
    });
    });

// After using PMO
// login.po.ts

loginUser(login, password) {
    $('#login').sendKeys(login);
    $('#password').sendKeys(password);
    $('.btn-login').click()	;
}

// login.e2e-spec.ts

describe(‘Login’, () => {
// calling a class instance
	const login: Login = new Login();

beforeEach(() => {
	login.loginUser(‘name’, ‘password’);
});

    it(‘I want to login’, () => {
//do expects
});

it(‘and once again I want to login’, () => {
//do expects
});

it(‘and once again I want to login’, () => {
//do expects
});
});
Once again, our code is getting more readable.
If you decided to write automated e2e tests for your Angular application you are following a good way. It is impossible not to agree that the protractor tool has many drawbacks, as well as many advantages. One thing is certain – automatic tests add value to the project and increase its quality. Let’s hope that soon they will become an inseparable element of every project. Below you can find a small package with modified protractor-html-reporter-2 and ready config file. Just clone the repo and let’s get down to business.

 Hi, I’m Marcin, COO of Applandeo
Are you looking for a tech partner? Searching for a new job? Or do you simply have any feedback that you'd like to share with our team? Whatever brings you to us, we'll do our best to help you. Don't hesitate and drop us a message!
Drop a message