
SwiftUI, two-way binding and more
Let's take a deep dive into SwiftUI, a new UI framework in action.
Let's take a deep dive into SwiftUI, a new UI framework in action.
The user interface of a mobile application is the first thing the end-user sees when launching a brand new app. We all know the application interface should be usable and eye-catching. Although sometimes, designers (push their creativity to the edges) allow themselves too much, and developers have to deal with that in some way. In this war, between designers and developers, Apple has developed a new “weapon” for iOS developers called SwiftUI.
So far, on iOS, we have had two main capabilities to create user interfaces – we could either use Storyboards or write views layout with code. Both approaches have pros and cons. Developers mostly have their preferences; sometimes, they mix both possibilities; sometimes, they use only one of these two. The good news is now they get a new option – SwiftUI! It allows us to create views with code as well. The style of this code is different, though. Is it better? Check out the rest of this post to get my findings on the subject.
Creating views with storyboards is extremely simple. You can drag and drop some of the elements of UI onto the view, attach constraints, and get it right without a simple line of code. Nevertheless, we know this ideal scenario happens only in theory. How does it work in practice? You most likely have to wait until storyboard renders in Xcode; switching between different storyboards takes a lot of time, and often debugging views created with a storyboard is a road of torment. So, we can create views with a simple code, which is easy to debug. Although sometimes you have to write many lines of code to achieve some simple effect.
SwiftUI finds its way to get ahead of this problem. It combines a live preview of the created view from Storyboards with writing simple code, which you can customize any way you want. It also allows us to add multiple modificators to views by just clicking, and proper code generates automatically. Honestly, creating new custom controls/views is that simple right now! What is the secret power of SwiftUI? We do not have to argue with our colleagues about programmatic or storyboard design anymore. Right now, we combine them both, knowing their pros and some cons.
Let’s assume we have to write a simple login form – just two text fields and one button. Something that you can see in the following screen:
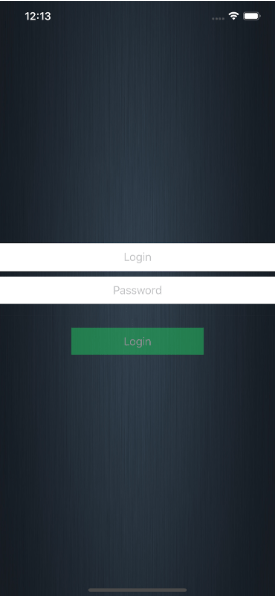
If we want to build such a view using code in the old way, we have to create 2 UITextFields, one UIButton, add UIImageView as background, and that assign constraints. Constraints we can configure in different ways – calculate positions or use UIStackView and setup required parameters to it. After that, we have to launch such a project and check if everything is in place. It may not sound hard, but it is time-expensive. How about such a view in SwiftUI? If I tell you that you can achieve that in 46 lines of code (with enters and closing brackets), will I have your attention? So, let’s build this view.
I will skip the project creation phase. You need to create a new project. Remember to check SwiftUI during the creation process and navigate to file with view, which should be named ContentView.swift in a new project. In computed property “body” we have to define our view. So, what do we need next?
Firstly, as in old-school, we need some navigation controller – in SwiftUI we will choose the NavigationView. In its body, we will declare the appearance of our view. The next element is VStack, as we want to arrange views vertically, one by one. In VStack body, we will declare our text fields and buttons. The text field in SwiftUI is named… TextField. We put it into our code.
Now we have to style it – declare some padding, textAlignment, background, capitalizationStyle and keyboardType. Then do the same with the second TextField. But..we cannot set secureEntry property on TextField. So what? We can use SecureField – and style it in the same way as TextField. It is awesome! Don’t you think? The interesting thing is related to the Login button – which is not a button! It is a NavigationLink – so yes, right now, you have a separate element that can navigate you to another view (make push), but you can customize it in any way you want – it could be even a simple label.
Now let’s move on to connecting this pretty cool SwiftUI view with our view model. In standard rx way, we should create behavior relays for login and password fields, and in viewController, we should create a binding with login button action. It deserves note that with SwiftUI we don’t have ViewController – so now MVVM architecture looks more like it should do. Back to the issue of connecting viewModel with the view – SwiftUI gives us powerful tools. We can make it in a simple way binding values and also two-way binding (or bibinding). So let’s look at the code:
class StartViewModel: ObservableObject {
    let objectWillChange = ObjectWillChangePublisher()
    var login: String = "" {
        didSet {
            objectWillChange.send()
        }
    }
    var password: String = "" {
        didSet {
            objectWillChange.send()
        }
    }
    var canLogin: Bool {
        return !login.isEmpty && !password.isEmpty
    }
    func changeValue(withValue value: String) {
        login = value
    }
    func printValue() {
        print("Current value: \(login)")
    }
}
My model is called StartViewModel, which conforms to ObservableObject protocol. This protocol has only one requirement – we need to create constant, which will be ObjectWillChangePublisher(). This one allows you to notify ‘view’ that something has changed, and it should update displayed values. In this implementation, I have met this requirement, and then I have created two Strings – login and password. These are simple strings – not customized types are necessary for two-way binding right now! Awesome, right? When the value is updated, just before that, we are calling send() method to inform view that viewModel had changed, and it should update content.
Now let’s check view implementation – below there are code results with a login screen which screen is at the top of this article:
import SwiftUI
struct StartView: View {
    @ObservedObject var model = StartViewModel()
    var body: some View {
        NavigationView {
            VStack(alignment: .center) {
                Spacer()
                TextField("Login", text: $model.login)
                    .padding(.vertical, 10.0)
                    .multilineTextAlignment(.center)
                    .background(Color.white)
                    .autocapitalization(.none)
                    .keyboardType(.emailAddress)
                SecureField("Password", text: $model.password)
                    .padding(.vertical, 10.0)
                    .multilineTextAlignment(.center)
                    .background(Color.white)
                    .keyboardType(.alphabet)
                Divider()
                    .frame(height: 20.0)
                NavigationLink(destination: DetailsView()) {
                    Text("Login")
                        .foregroundColor(model.canLogin ? Color.white : Color.gray)
                        .padding(.vertical, 10.0)
                        .frame(width: 200.0)
                        .background(!model.canLogin ? Color.green.opacity(0.5) : Color.green )
                        .animation(.easeIn(duration: 0.5))
                }.disabled(!model.canLogin)
                Spacer()
            }.background(Image("image_bxackground").resizable()).edgesIgnoringSafeArea([.top, .bottom])
            .onTapGesture {
                UIApplication.shared.endEditing()
            }
        }
    }
}
As you can see, I’ve prepared one variable called model, which represents my ViewModel for this view. Before the declaration, there is a new keyword ObservedObject -> this one tells that the value of that object can change, and view should respond to this object changes. So, how is it working? Let’s have a look at the login text field configuration:
TextField("Login", text: $model.login)
                    .padding(.vertical, 10.0)
                    .multilineTextAlignment(.center)
                    .background(Color.white)
                    .autocapitalization(.none)
                    .keyboardType(.emailAddress)
In this declaration, we specify “Login” as a placeholder for this text field; we configure padding, text alignment, background, capitalization mode, and keyboard type – for me, this code is brilliant and easy-readable. As a “text” property, I’ve inserted $model.login. But you can ask me – what is this $ character? It is not a swift-like code! And I agree with you, but.. this little dollar I hope will make me a lot of dollars on my bank account in the future. By this character, I’m telling this field: “Ok, my text field – this is your source of text; you can read it and modify it.” So by four lines of code, I have achieved a binding text field with string from viewModel.
So, you could ask me: “Wait, wait – where is your two-way binding?? You assign a value of text field to variable in the model, where is this second way of binding?”. And I can answer you. In viewModel there is a simple function called changeLoginValue, and code for this method is the following:
func changeLoginValue(withValue value: String) {
        login = value
    }
Let’s make a new button that will call this function – is super easy, see next code snippet:
Button(action: {
                    self.model.changeLoginValue(withValue: "[email protected]")
                }, label: {
                    Text("Change login value")
                    .frame(width: 200.0)
                    .padding(.vertical, 10.0)
                    .background(Color.red)
                })
So we have created a simple button which will call the method from viewModel, and we configured its text label. That is a cool feature in SwiftUI. There is no problem putting another view in button, use another Button constructor, and add any view to it – no subclassing necessary, no overriding draw function, etc.
Let’s compile our app and see what will happen:
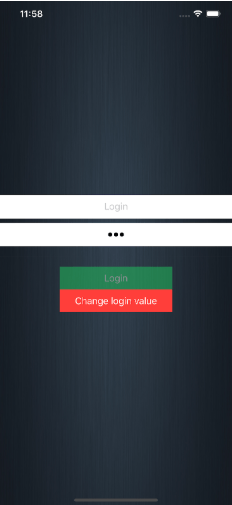
Hmm – this looks almost right. We need to separate our buttons. How? In the most simple way – we can embed them in VStack again. Look below for updated view code:
struct StartView: View {
    @ObservedObject var model = StartViewModel()
    var body: some View {
        NavigationView {
            VStack(alignment: .center) {
                Spacer()
                TextField("Login", text: $model.login)
                    .padding(.vertical, 10.0)
                    .multilineTextAlignment(.center)
                    .background(Color.white)
                    .autocapitalization(.none)
                    .keyboardType(.emailAddress)
                SecureField("Password", text: $model.password)
                    .padding(.vertical, 10.0)
                    .multilineTextAlignment(.center)
                    .background(Color.white)
                    .keyboardType(.alphabet)
                Divider()
                    .frame(height: 20.0)
                VStack(alignment: .center, spacing: 10) {
                    NavigationLink(destination: DetailsView()) {
                        Text("Login")
                            .foregroundColor(model.canLogin ? Color.white : Color.gray)
                            .padding(.vertical, 10.0)
                            .frame(width: 200.0)
                            .background(!model.canLogin ? Color.green.opacity(0.5) : Color.green )
                            .animation(.easeIn(duration: 0.5))
                    }.disabled(!model.canLogin)
                    Button(action: {
                        self.model.changeLoginValue(withValue: "[email protected]")
                    }, label: {
                        Text("Change login value")
                        .foregroundColor(Color.white)
                        .frame(width: 200.0)
                        .padding(.vertical, 10.0)
                        .background(Color.red)
                    })
                }
                Spacer()
            }.background(Image("image_background").resizable()).edgesIgnoringSafeArea([.top, .bottom])
            .onTapGesture {
                UIApplication.shared.endEditing()
            }
        }
        .onDisappear {
            print("Disapeared")
        }
    }
}
After again run, you will see the following result:
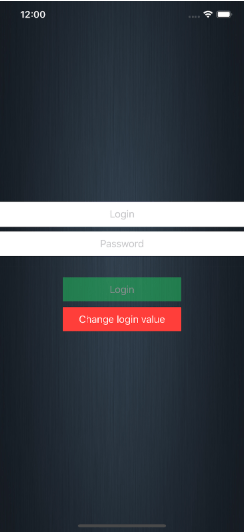
Just brilliant! Ok, so right now, I should explain one last feature of this view. Now the login button is disabled – after you type something in login and password fields, it becomes active. How is it done? If you went through code carefully, you might have noticed that there is something undescribed in this article yet. See NavigationLink declaration:
NavigationLink(destination: DetailsView()) {
                        Text("Login")
                            .foregroundColor(model.canLogin ? Color.white : Color.gray)
                            .padding(.vertical, 10.0)
                            .frame(width: 200.0)
                            .background(!model.canLogin ? Color.green.opacity(0.5) : Color.green )
                            .animation(.easeIn(duration: 0.5))
                    }.disabled(!model.canLogin)
The last property for navigation link (and only property for this component) is .disabled property, and this one read value from our viewModel. In viewModel, I check if login and password fields are empty; if not, it returns true, so I’ve had to negate this value.
What is more, I am changing the background color of text for Navigation Link – I am adjusting opacity depending on the value from the model. And it is animating too! With this one small property .animation, you can specify what kind of animation should get performed when text is set up! But again, you can ask me – why? Who is calling that? And a simple answer is our bibinding!
As you remember, our TextFields connect with viewModel, and if a value in model changes, view is reacting to this. When we type something in the field, view gets notified that viewModel has changed, and it updates due to these changes. Also, if we hit “Change login value” button value in a field, login will change. So let’s make a small test. I will type something into the password field, and after that, I will hit “Change login value.” By then, the button should be solid green and active, so after clicking this button, it should navigate me to the next screen.
And it is working! So We have just created a simple login screen with bibinding!
But, you have noticed that I was able to hide the keyboard after I clicked outside fields. SwiftUI doesn’t have method endEditing like standard viewControllers, so I’ve managed to implement something, may not be great, it is not terrible, though.
Check the next snippet:
import SwiftUI
extension UIApplication {
    func endEditing() {
        sendAction(#selector(UIResponder.resignFirstResponder), to: nil, from: nil, for: nil)
    }
}
And this one function is being called in our view – probably you have noticed this line – I’ve added behavior on tap gesture on our VStack with fields and buttons:
.onTapGesture {
                UIApplication.shared.endEditing()
}What I do not like in the code that I have implemented is a way it goes to the next view. I am putting a simple constructor of a new view, which is, in my opinion, really bad. What can we do with that? I like “router-based” navigation, and I thought a lot about how to achieve this. I was making different protocols, some wrappers, etc. but suddenly, I came up with the simplest solution. So let’s have a look:
import SwiftUI
protocol SampleRoutable {
    func presentDetails() -> DetailsView
}
class SampleRouter: SampleRoutable {
    func presentDetails() -> DetailsView {
        return DetailsView()
    }
}
You can see that in SwiftUI my router should return a whole new view so that I can put any configuration parameter for my view, I can pass some object, etc. In this case, I’m merely returning my DetailsView(). And now have a look into NavigationLink on my StartView:
NavigationLink(destination: router.presentDetails()) {
                        Text("Login")
                            .foregroundColor(model.canLogin ? Color.white : Color.gray)
                            .padding(.vertical, 10.0)
                            .frame(width: 200.0)
                            .background(!model.canLogin ? Color.green.opacity(0.5) : Color.green )
                            .animation(.easeIn(duration: 0.5))
                    }.disabled(!model.canLogin)
As you can see – right now, view is not creating a new view – the router is responsible for this. With proper DI it could be a friendly solution, but for sure in SwiftUI we can achieve this in a significant number of ways. Maybe we should take a look at this in the next article? Let us know your feedback!
As you can see, SwiftUI is a neat way to develop views. Apple has announced that, with this framework, MVVM architecture is the one we should use. So, no more Massive View Controllers! In my opinion, this way of creating views is pretty cool. Although, we surely need to dig deeper into this framework to get to know it better and to use it better. It likely needs more time to settle down as the major technique of developing new applications, but I can not wait to start building real apps with it!
You can try out the sample project. Here is the link to a repository.
Do you have any questions about the given technologies, related projects, or would you like to share your feedback? Let’s get in touch. In the meantime, you can check our Swift App Development offer – we’ve already mastered this one.
 Hi, I’m Marcin, COO of Applandeo
Are you looking for a tech partner? Searching for a new job? Or do you simply have any feedback that you'd like to share with our team? Whatever brings you to us, we'll do our best to help you. Don't hesitate and drop us a message!
Drop a message